Table of Contents
Today, with the development of modern technology, we can see so many applications are using face detection technologies to make their solutions optimal. Let us try to get started with this interesting technology through this article.
In this article, we will discuss how we can detect faces in a given image file using OpenCV open-source library.
What will you learn?
After going through this article, you will learn:
- What is OpenCV
- What is a cascade file
- How to use OpenCV to detect faces.
- How to draw rectangle boxes around the detected faces.
Prerequisites
Before continuing, make sure you have the following installed:
- Python 3
- Visual Studio Code / Text Editor / NotePad++
What is OpenCV?
Open CV is an Open Source library used for computer vision purposes. This library is written in C/C++. Since objects are complex to detect using simple algorithms, this library uses machine learning algorithms to detect objects. However, just like any other computer vision algorithm, we can’t say these predictions are 100% correct.
[adinserter block=”2″]
What is Cascade File?
Cascade file is XML, a file that contains OpenCV data used to detect objects. There are many cascade files to detect different things, such as faces, animals, fruits, vehicles, etc. Since we are going to detect faces, we need to download the cascade file for face detection.
Install OpenCV
First, create a folder named “FaceDetection”. Inside that folder, create a file and name it “Start.py”. Then Open your terminal/command prompt and navigate into the FaceDetection folder, then run the following commands, and results will be as shown:

Explanation:
- Since we are using Python3, we can use a package installer named PIP for our installation process.
- PIP installs with Python3 automatically.
- pip -V: Use to check the version of pip. (outputs 20.2)
- pip install OpenCV-python: Use to install OpenCV for python. (If this is not already installed, your output should be different from this.)
Check Whether OpenCV is installed Successfully.
Before going to other steps, we need to check whether our installation process was successful or not. In your Start.py, insert the following code and run that file:

(Note: To run python file, run python Start.py in terminal/command prompt)
Explanation:
- By the above code
import cv2, we import the OpenCV library to our project. - If the output was nothing, that means the library was imported successfully.
- Otherwise, if there is an error, the library import has failed. This could happen due to installation errors.
If there is no error, we can go to the next step.
[adinserter block=”2″]
Download Required Files
Download the following files.
1. Face detection harcascade XML file
2. An image.

Download those files and store them in the FaceDetection folder.
Use OpenCV to Detect Faces
Part 1 (setup environment for FaceDetection)
Add the following codes to Start.py
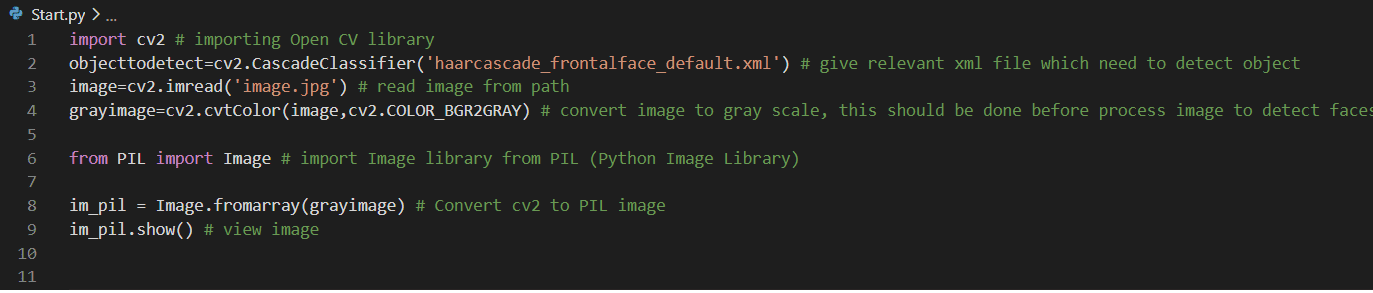
- importing Open CV library
import cv2
- Give relevant XML file which needs to detect an object.
objecttodetect=cv2.CascadeClassifier(“haarcascade_frontalface_default.xml”)
- Read the image from the path.
image=cv2.imread(‘image.jpg’)
- Convert image to grayscale; this should be done before process the image to detect faces.
grayimage=cv2.cvtColor(image, cv2.COLOR_BGR2GRAY)
- Import Image library from PIL (Python Image Library)
from PIL import Image
- Convert cv2 to PIL image
im_pil = Image.fromarray(grayimage)
- Show the result of part 1
im_pil.show()
The Start.py will look like this after adding the codes above:
Output
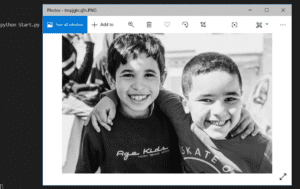
Now part 1 is completed. In that part, we imported cv2, configured the cascade file, loaded the image, converted the image to grayscale.
Now Let’s move to the next part.
Part 2 (Detect Faces)
Add the following codes to Start.py
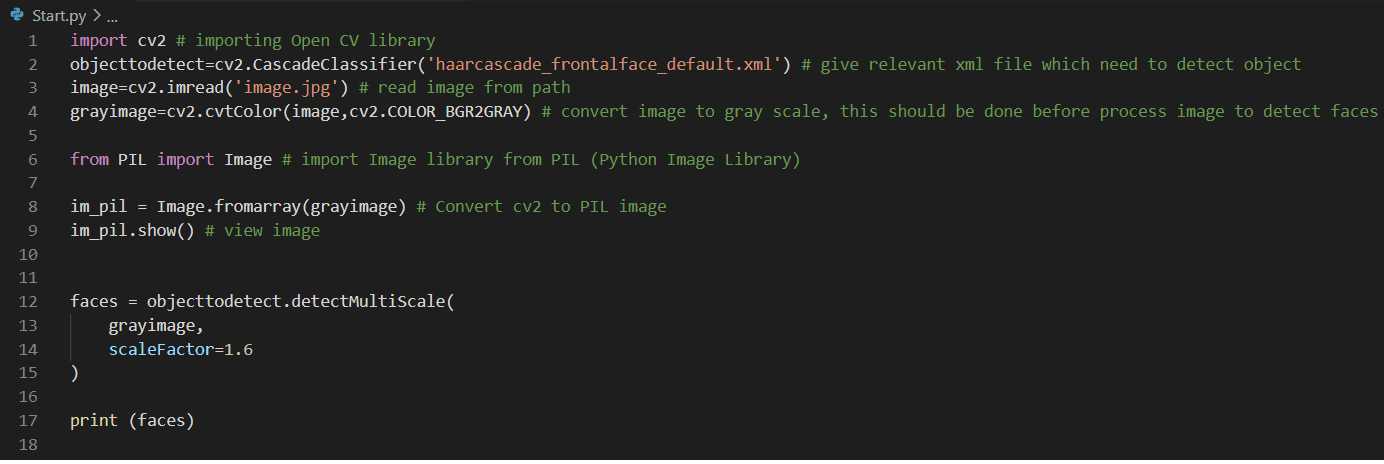
The below code is used to detect faces from the given image. We should give some parameters for this task. To make it easy to understand, we use only two parameters for now.
Image: Image we need to use for face detection. (Note: We cannot directly put images to this parameter. We should follow the process in Part 1)
Scale factor: If we take a photo, we can see some faces near the camera, and some are far from the camera. We use this parameter to reduce the error which can occur due to this reason.
faces = objecttodetect.detectMultiScale(grayimage,scaleFactor=1.6)
print (faces)
After running this code, it detects faces and creates a rectangle for each one. Those data for faces are stored as an array of arrays, which store data about rectangles. The data in the rectangle array stored according to the following structure:
[(x coordinate of rectangle), (y coordinate of rectangle), (width of rectangle), (height of rectangle)]Now Let’s print and see that array:
Output

Here you can see it detected two faces in our image successfully.
[adinserter block=”2″]
Part 3 (Draw rectangle around the detected faces)
Now let us draw rectangles around detected faces. Add the following codes to Start.py
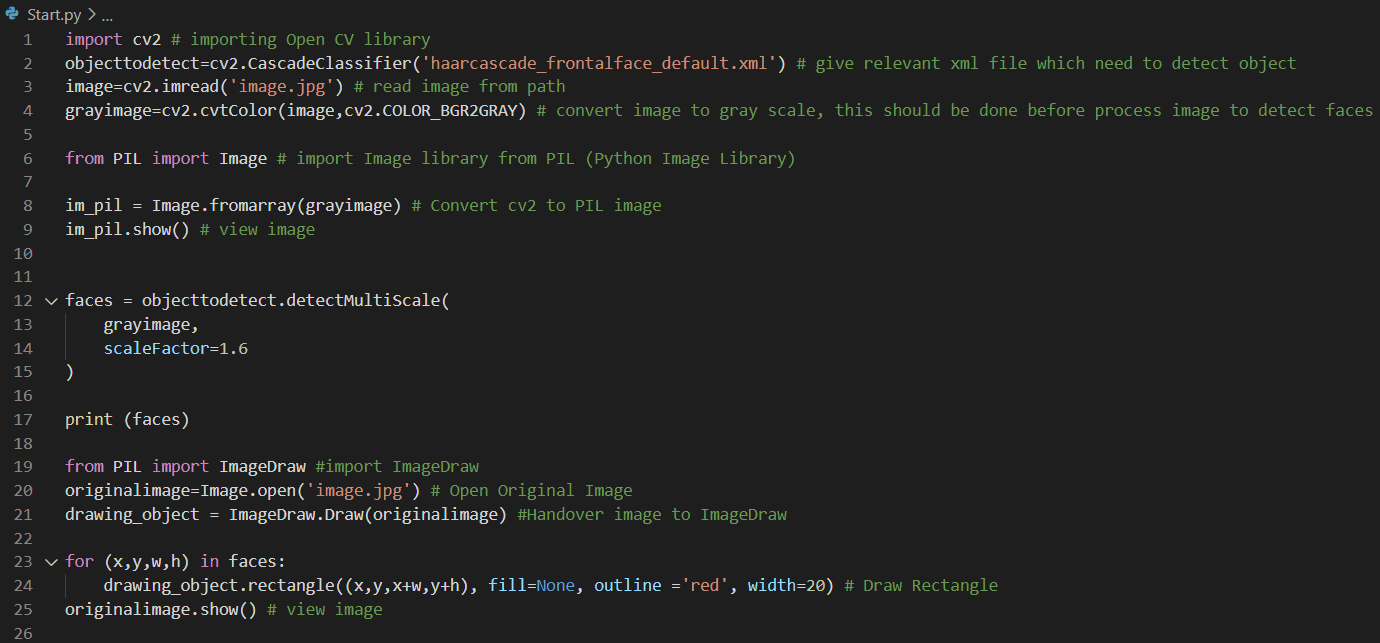
- Import ImageDraw from PIL and handover original image to image drawing
from PIL import ImageDraw
originalimage=Image.open('image.jpg')
drawing_object = ImageDraw.Draw(originalimage)
- Draw rectangles for each face rectangles in the array,
for (x,y,w,h) in faces:
drawing_object.rectangle((x,y,x+w,y+h), fill=None, outline ='red', width=20)
- Show the result
originalimage.show()
Start.py after adding those codes:
Output after running Start.py

We can see that rectangles were successfully drawn around detected faces.
Conclusion
Step by step, we have reached the end of the article. In this article, we learned about OpenCV, cascade files, the installation of OpenCV for python, the usage of OpenCV to detect faces, and how to draw rectangles around the detected faces. I hope this was very useful for getting started with face detecting technology in the modern world.
Blog Hero